Sunday, February 26, 2006

Knitting Olympics

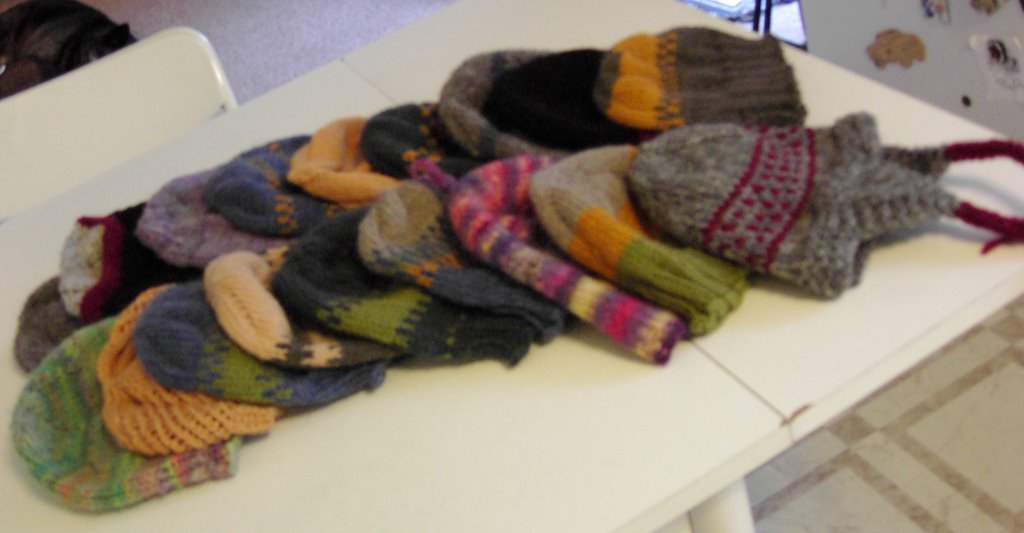
As of Friday night, I was short about 3 hats to finish. But today, the final count is 18!! Yes, 18 HATS! The last one was cast on during the car ride out to Vancouver to watch the Closing Ceremonies at the Vancouver Library Square. And I finished binding off just as the Olympic flag was handed over to Mr. Mayor of Vancouver - Sam Sullivan. That's 2 hats over my goal of 16!

I decided to knit a few extra hats when I found I had leftover time because some of the hats looked a bit odd. It was more a design feature (like the flat top hat...what was I thinking?!) Anyhow, it's all good...the real winners here will be the kids these hats will be going to, right?

Perhaps the whole idea of the Knitting Olympics started as a whim on Yarn Harlot part but it was so well-received by knitters all around the world. Over 4000 knitters gave their personal best during the 16 day Olympic event. At the lighting of the torch, knitters cast on their projects. The only goal is to finish whatever we set out for ourselves by the end of the closing ceremonies.

I've participated in Knit-alongs before but nothing like this. I have to admit that if it wasn't for the fact that I had publicly committed myself, I would not have finished this many hats. It was a lot of fun reading what challenges other knitters were facing.

And like the other Olympic, there were teams from all over the world (and teams for just about any reason to knit). Team Canada had several get-togethers for the opening and closing ceremonies. From the pics folks have posted, a good time was had by all.

This was a lot of fun and I thank the Yarn Harlot and her team for organizing the Knitting Olympics and the organizers of Team Canada for giving us a cyberplace to meet. It was a great feeling to be part of something this big.

I hope to see everyone in the 2010 Knitting Olympics. It will be held right here in my backyard (practically).

Happy Knitting!
Lavender

Friday, February 03, 2006

Necessity is the Mother of Invention

This is Lavender's concept brought to life by Teal.

Lavender expressed a wish for a treadle on her carder - she wanted something slower than an electric carder that would leave her hands free for teasing and feeding the fibre. Teal likes to play with ideas and thought Lavender had come up with something really great to play with(with which to play?).

So the experiments began. Both Lavender and Teal have Patrick Green's "Beverly " carder. Great carders!

THIS IS THE DISCLAIMER!! PLEASE DO NOT TRY THIS EXPERIMENT AT HOME! It may lead to permanent damage of your equipment and your psyche!!!!

Having said that, I'll tell you what we did so you can improve on the concept, because it does seem easier than hand cranking. The handle was removed from the crank shaft. The "Beverly" comes with a second BLENDING wheel and this blending wheel was placed on the crank shaft(a very tiny amount of long wool fibre was added for traction). This is one of the areas that may be problematic. The fibres were wrapped around the out side of the shaft from one side to the other and then fed through the holes on the side of the shaft and out the hole on the end of the shaft(I would draw you a diagram - but I'm new to blogging and don't know how). The blending wheel was pushed snuggly over the fibre to fit without slipping. Note of caution: We have not yet determined if we will be able to get this wheel off the crank shaft or if the stress of the drive band will damage the wheel.

The carder was then supported on the top of a treadle sewing machine( with a board to prevent it falling into the machine well) and a drive band of candle wicking was used to go around the carder wheel and treadle wheel.

That's the basics.

Suggestion for improvements:

-it might work better if the carder was set on a board attached directly to the treadle frame as the cabinet is interfering with the smooth flow of the belt which makes it harder to treadle and also wears out the belt

- we are also looking for better belting material. Our first choice would be a material similar to the drive bands that come with the carder - but we haven't found a local source yet.

-we put a large wide elastic band around the blending wheel(before attaching the drive band) to increase traction and protect the blending wheel from some of the wear caused by the drive band

It is handy to sit and treadle your way through a fleece or pound of colour. However, the current set up requires that only small amounts of well teased fibre are put through the carder - which is great for our colour blending since most of it has already been through the carder 5-7 times. This experiment is working well for our purposes now. I would want to be able to make the improvements listed above before using it for all my carding needs.

Oh yes, I was serious about the disclaimer - my blending wheel appears stuck on the crank shaft - I'm assuming it will come off with some lubrication - but I need it where it is for just now.

Let us know if you have any suggestions for improvments. We are also interested in knowing how those of you with electric carders find them. We have tried the supercarder but are wondering about the "Fancy Carder" and some of the electric conversions for the "Beverly" etc.

Happy Experiments,

Teal

Thursday, February 02, 2006

The Project

Last March we embarked upon a project to further our understanding of colour theory and how it applies to our fibre work, specifically blending colour for spinning. The works of Deb Menz and others inspired this project. Two of our members, Teal and Rose, were the planners, the rest of us followed along. We all expected that this to be a BIG PROJECT that would take us the Spring and maybe the Summer to finish. BIG MISTAKE! 11 months and counting we are maybe half to three quarters finished.

We got underway one Saturday. We arrived at the Art Centre, as we often do, in convoy, laden down with 8 lbs of Perendale fleece, Ciba (washfast acid) Dyes, dye pots, hot plates, butane stoves, acetic acid, gloves, masks, etc.


About seven hours later we emerged with one pound each of wet fleece in each of the following colours: scarlet, blue, turquoise, magenta, yellow, golden yellow, and black. One pound was left undyed white. In the process we practically emptied the Art Centre. Apparently some people don't have the same affection for the aroma of seven acid dye pots full of wet wool as we do.

Then we started carding, and carding and carding. Do you know how long it takes to pick and card a pound of dyed roving? A lonnnng time.

Once we had bags of carded bats of each of our original colours, the blending and the MATH started. Through the summer and the fall we produced bags of bats of our warm and cool blended primaries; blue, red and yellow.

Next we embarked upon blending our secondaries:

Orange(Golden yellow and Scarlet)
Green(Yellow and Turquoise)
Violet(Magenta and blue) (this one via Saskatchewan)

And now on to the tertiaries! And we thought the math was hard before.

Now we just nodded confidentially as Teal told us how much of each secondary to weigh out on the scale.

Here is where we are at today; finished all but two tertiaries.


Red-Orange(BlendedRed-Orange)Yellow-Orange (Blended Yellow-Orange)
Red-Violet (Blended Red-Violet) Yellow-Green (Blended Yellow-Green) Blue-Violet (Blended Blue-Violet)Blue-Green (Blended Blue-Green)

Jade